
I just came across this image I captured years ago. It lived on an old hard drive and wasn’t given a second thought. This shot is pretty different from how I shoot now but I wanted to share it here because like all photographs we make, it’s part of the process. I feel like I am a better photographer because of images like this one. Being able to self critique and see what did and didn’t work here. It’s a constant learning game and I’m sure I’ll share something another 5 years from now that I’m capturing in this present time and be able to express the same sentiment.
I feel like that’s part of the beauty of art; it keeps growing and if we put enough work in, so long as we’re doing it right, we do too.

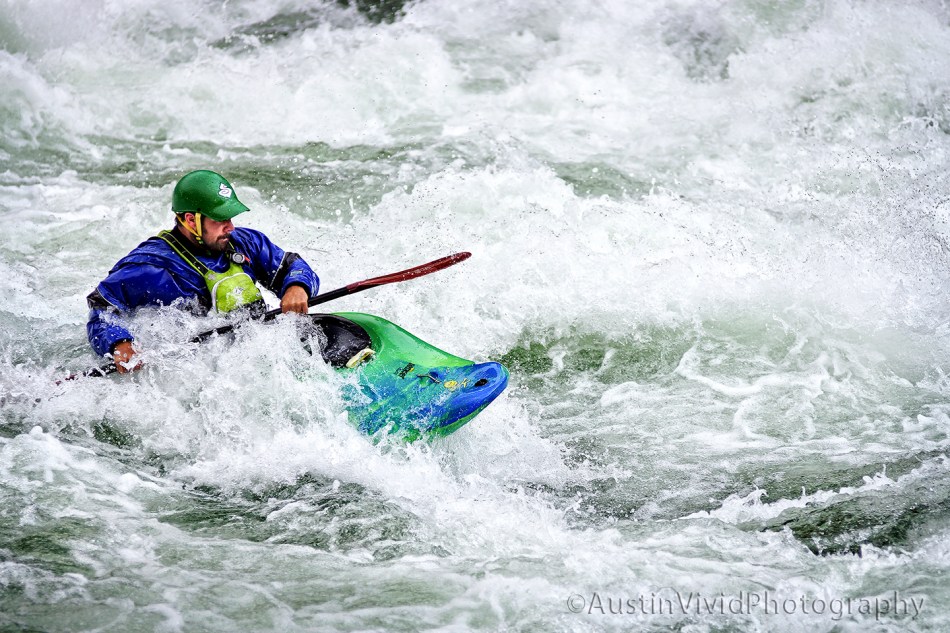
It’s always fun to set the shutter really fast to freeze water or to slow the shutter down to give it the nice fluid motion feel.
Here I decided to slow it down quite a bit to try and show the power of the flowing water while the kayaker surfed the swell on this river rapid. I’m pleased with the calm and contrasting energy that this captured.

In honor of this cold weather that’s swept the nation I wanted to share a few tips on shooting in cold weather.
• Batteries- Simply put, they drain faster in cold weather than in warm weather. The modern lithium-ion batteries do a pretty good job unless it’s extremely cold. In that case they can can be reduced to 50% or more. A great way to keep them from draining so fast is to keep them warm in your pockets while you’re out shooting or over night in your sleeping bag with you. Keep this in mind if your using an external flash. Those batteries need to stay warm too. It never hurts to have a couple of back ups to help compensate for the extra drain on your batteries.
• Pick up a pack of hand warmers. I never used these until I moved down to Austin, Texas which is strange since I used to live in the northeast. I guess the warm weather down here has made me a bit of a wimp when it comes to cooler temps. Anyways, when your out shooting in the cold for more than 6 hours at a time the warmers make a big difference in my comfort. Of course your hands are out on your camera most of the time but when your moving around in between shots it’s nice to get your hands warmed up in your pockets if even for a moment.
• Lens Fogging – If your shooting in the cold you’ll face your lens fogging up with condensation at some point or another. Essentially condensation is water forming on surfaces that are significantly colder or warmer than the air surrounding it. So this means that if your camera goes into a cold air area and the camera is warmer than the dew point, condensation can form. The opposite is also true. So this typically happens to me from being in a warm car on the way to the shoot and then hoping out of the car on a crazy cold day. What I do to combat this from making me wait around until my lens stops fogging up is take my camera out of my bag and toss it around my neck right away. That way it has a chance to start coming to temperature while I’m getting to the location I am going to be shooting at. I also keep my camera in the coldest part of my vehicle which for me is in the back. If I had a trunk that would be where it would be. I also arrive at my shoots with plenty of time to spare so my vehicle is pretty cool by the time I’m getting out. That’s one of the many advantages to being punctual. The next little tip is also very helpful for this condensation issue.
• Condensation/Lens Fogging- After shooting in the cold you’re not going to want to take your camera straight into a warm building or tent. You’re going to want to give it some time to acclimatize to the warmer interior. While you’re still out in the cold seal your camera in an airtight bag before taking it in. This way, any condensation will form on the bag instead of the camera as the air and camera gradually equalize to the new environment. It’s also a good idea to keep it in the coolest part of the building you’re going into like by a window or even better if there’s a vestibule. Two hours should be plenty of time for your gear to warm up gradually. Don’t forget to take your camera cards out of the body before you place it in the bag if you need to upload them right away.
I hope some of these tips are helpful. In the meantime I’ll be dreaming of warmer weather.
If you want to see what else we’re up to please pop over and “Like” our Facebook page. Yeh, we still get stoked anytime we get a like or comment over there.
How To Protect Your Gear in the Rain.
This is a topic I’m asked about from time to time. When you’re a working photographer that doesn’t solely work in a studio you’re bound to end up in wet conditions with gear that’s not designed to be there with you. So what are you going to do? Luckily I live in a part of the country that boasts close to 300 days of sunshine so I don’t often come across this scenario but when I do this is how I handle it:
-Use your lens hood to help keep the falling rain off the front of the lens. As long as you’re aiming the lens straight or downward this does a decent job. I use my lens hood all the time anyways to help protect the front element from getting scratched as it gets bumped around.
-Use a rain cover for your bag. My F-Stop Gear bag cover saved me during the Cyclocross Nationals as I wanted a couple of extra lenses and batteries on hand but was standing in the rain for hours. That gear (and snacks) would have been ruined if it wasn’t for that cover. If your camera bag doesn’t come with a cover no worries you can buy one through Amazon or B&H for $5-$20. They fold up and stash in most bags pretty easily while not in use.
-Use a rain jacket for your camera and lens. If you’re shooting with either Nikon or Canon and don’t mind spending a bit of money you have to go with the THINK TANK PHOTO Hydrophobia Rain Cover. If you know you’re going to be standing out in a down pour for a few hours shooting, it’s worth the money. I shoot all Sony and like with most awesome things for cameras, they don’t make a version that works with my camera bodies. So what I use is anOP/TECH USA $3.25 rain sleeve. It does the job and I like the price. The bonus with this cheap option is it’s small enough to have stashed in my bag at all times unlike the Think Tank cover which is too big for me to keep on hand for a little bit of rain or a chance of rain.
-The last thing, which most people don’t think about, is keeping those little pouches of silica gel in your bag. They’re used to capture moister and help keep things dry.
So that’s just what I do though there’s tons of options out there to use. The main takeaway is, we have options to stay out there and shoot in the elements which gives us a different and sometimes more unique image.

The Sun shines not on us but in us. The Rivers flow not past, But through us.
– John Muir
Head over and follow our Facebook page for more images from the day.

Taking sunset silhouette photos is fun and easy. If you use these few tips I think you’ll agree.
First you need a subject that is obvious in shape. This photo was taken at a session I was doing for this awesome yoga instructor and I couldn’t resist as the light was getting just right. City skylines tend to work pretty well in this scenario and I’m sure you can think of a handful of other subjects that would do too. If I was doing a family portrait session I wouldn’t go for this shot because it would then just look like a big black blob with heads poking out.
Next, the great thing about these shots is you only need to expose for your sunset. Once you nail your setting for the beautiful sunset those rich blacks just happen on your subject. With that being said, just make sure you are shooting in the direction of the sun. And your subject will be between you and the sun.
So let’s get our setting for that rich sunset. There’s a handful of ways to get this but what I find as an easy fool proof way of doing this is to knock my exposure compensation down a bit. That’s the button that usually has a “+/-” on it. I typically end up going down a full -1 or even more. For this image I lowered my aperture to f/11 which also darkened the image by letting less light in.
I will say I ended up adding a magenta filter on for this shot because I liked those hues for this client. The only difference that made was in the upper left corner where you have the nice magenta toning it was more of a light blue. It looked good that way too but I thought this fit better for her. The filter definitely wasn’t necessary.
So all and all pretty easy, right? Way easier than having to add some fill light back on our subject.
Tips and Insights
What DSLR Camera To Buy
Canon v. Nikon
This is a dilemma I hear often, “I’m not sure whether to buy a Canon or Nikon?”. Spoiler alert: I am not going to tell you which one to buy, instead I am going to give you some sound advice on the topic to hopefully take some of the stress out of trying to decide. I get why people are perplexed by this choice. After all it is a hefty investment while you are at the beginning stages of your photographic career.
In addition I am not going to give you the pros and cons or even the stats between the two brands. First of all, you can find tons of side by side comparison charts all over the web and chances are you already have. Another reason is the technology is constantly changing so if I were to give comparisons today chances are they would be different tomorrow. Finally, I believe the prices of the different models along with their features are quite comparable between the two.
Now that we have covered the things I will not tell you lets take a look at the things I will tell you. I think it is important to know you will not go wrong with either brand of camera. Seriously, I have never heard a photographer say, ” I am a Canon or Nikon user but I really wish I chose the other guy.”. You have big time professional photographers that are die-hard users of both competitors. The great thing about these two is that these are the main guys out there at your photo meetup groups and within your community. The advantage that gives you is chances are you’re going to know another photographer to borrow lenses off of. You see, the lenses between the cameras are not interchangeable, so if you buy the Nikon you won’t be putting a Canon lens on it and visa versa. Mind you there are many other lens brands that are specifically made for both and are wonderful. Now that we are talking about lenses I feel I should mention good glass (referring to the lenses of course) is worth the money. Don’t go buy a fancy camera then put an inferior lens on the front of it. This is one of the pieces of your gear where you get what you pay for. Now to get back on topic. I think it is important for the camera to feel good in your hand. It sounds obvious but sometimes its difficult to remember that when you are looking back and forth at the overviews between the two online. Go to your local camera shop and ask to hold each of them. It’s okay that you don’t know how to use it yet, just put it in “P” program mode or even “Auto” look through the viewfinder and press that shutter release and see which one sings to your heart. Check out where the buttons and dials are in relation to where your hands rest, even if you have no clue what they do yet. In not too much time once you take one of these home it will become an extension of you. Like I said in the beginning you can’t make a bad decision between Canon or Nikon in my opinion. Try to focus on the excitement of making one of these the start to your fun-filled future.
Sorry if this takes you back to square one but I feel like I should suggest you take a quick peek at the Sony before making your final decision. They have some serious advancements in their technology that is cutting edge. I wouldn’t be surprised is Canon and Nikon start mimicking some of their technology in the next few years.

Tips and Insights
Photography Vocabulary
Starting out in photography can be challenging enough. There are times when it seems as though we’re speaking our own language. It’s what makes us feel special. Below is a list of some of our verbage decoded. Use it as often as possible to feel like one of the cool kids.
This list should be a pretty good starting point to hopefully move you along to getting out there and getting some photographs instead of scratching your head wondering if you should have shot racked out with the aperture wide open.
- Aperture– The lens opening. The opening in a camera lens through which light passes to expose the film or sensor. Aperture size is usually calibrated in f-numbers such as f-1.4 or f-16. The larger the number, the smaller the lens opening. We’ll get more in-depth on that subject another time.
- Exposure– The amount of light reaching the film or sensor. Exposure is controlled by aperture size and shutter speed. Example : An overexposed photo would be too light, while an underexposed photo would appear too dark.
- Shutter Speed– The amount of time the camera keeps the shutter open to capture the image. A fast shutter speed such as 1/640 will help you freeze any movement while a slow shutter speed such as 1/4 will more than likely blur an object in motion which is sometimes desired.
- ISO– International Standards Organization. That doesn’t really help with explaining what it is now does it? Essentially it measures the sensitivity of the image sensor. The lower the number (ex. 100 ISO) the less sensitive your camera is to light and the finer the grain. The higher the number (ex. 3200 ISO) the more sensitive your camera is to light and the coarser the grain. Typically speaking you would not want a grainy photo so the only time you would raise your ISO high would be in a dimmer setting when you’re not shooting with a tripod.
- Bracketing– To take a series of photos at different exposures.
- HDR– High Dynamic Range. This is when you combine multiple photos of different exposures to form an image which shows very bright and very dark areas properly exposed in one image. This is currently a popular technique that you probably see often.
- Fill-Flash– This is when you use existing available light (also called ambient light) in combination with your flash to give a pleasing mix of the two.
- Dodging– Selectively lightening part of your photo.
- Burning– Selectively darkening part of your photo.
- Panning– Moving the camera along with the moving object so that the object remains in the same relative position in the viewfinder as you take a picture. What this does is blur out what is not moving while keeping your moving object tack sharp. This is a wonderful technique to show action and makes the photo really come alive. It pays of to use burst mode if you can when applying this technique. If nothing else it will make onlookers think you know what you’re doing!
This is a short list that will hopefully get you in the know. By the way, “shooting racked” out simply refers to shooting zoomed all the way on whatever lens you’re using like 200mm on a 70-200mm lens. “Wide open” refers to a large aperture number like a 2.8 where the opening of the lens is wider. Now that you know shooting racked out and wide open can simply mean shooting at 2.8 and 200mm you are one of the cool kids.

Welcome to Tips and Insights
This portion of our website is dedicated to highlighting fun photography tips, tricks, and sometimes a useful gadget or two. The info here is geared more for the novice photographer. If you have anything interesting to add that may be helpful to others please shoot us an email and we will be happy to post it while giving you props. After all, by working together we all improve at a faster pace, and it sure is a lot more fun.
That being said, I think it is important to note that though photography does have its own set of rules such as, “the rule of thirds”, “the golden rule”, “the rule of using AVP as your photographer” (okay, I made the last one up) etc., there are always very good reasons to break rules. Just because they work most of the time does not mean they work all of the time. Think of these tips as more of guidelines. Once you learn them, think outside the box. Some of the most outstanding photographs don’t always follow the rules.
There is however one rule you never want to break. This rule I hold very close, and I urge you to do the same. Are you ready for it? Okay, here it is…Have Fun. I know this may sound lame, but I truly believe if you’re not having fun you’re not doing it right. It seems the camera knows when you’re not into it, because you end up with flat, lifeless photographs. So consider this your first tip: Always let your emotions drive your photographs.
Please feel free to give us feedback for things you may like to see in upcoming Tips and Insights as it is always welcome. Until next time, Have Fun!
–Austin Vivid Photography

